**Creating delightful cake pops, those bite-sized spheres of cake and frosting on a stick, has become a beloved baking trend, perfect for parties, gifts, or simply a sweet treat. While the concept might seem simple, achieving consistently perfect, uniform shapes can be a challenge without the right tools. This is where high-quality cake pop molds come into play, transforming a potentially messy endeavor into a streamlined, enjoyable baking experience. From classic spheres to whimsical 3D designs, the right mold ensures your cake pops are not only delicious but also visually stunning, making every batch a success.** **For anyone venturing into the world of cake pop creation, understanding the different types of molds available and how to best utilize them is key. Whether you're a seasoned baker looking to expand your repertoire or a beginner eager to try your hand at this fun dessert, investing in the right cake pop molds can significantly elevate your results. They are the secret weapon for achieving that professional, uniform look, ensuring "no fuss, no mess, same great shape every time." Let's dive into everything you need to know about these essential baking tools.**
Table of Contents
- The Magic of Cake Pop Molds: Why They're Essential
- Types of Cake Pop Molds: Finding Your Perfect Match
- Preparing Your Cake: The Foundation for Perfect Pops
- Mastering the Mold: Step-by-Step Guide to Using Cake Pop Molds
- Decorating Your Masterpieces: Beyond the Mold
- Choosing the Best Cake Pop Molds for Your Needs
- Troubleshooting Common Cake Pop Mold Challenges
- The Ultimate Cake Pop Experience: Kits and Accessories
The Magic of Cake Pop Molds: Why They're Essential
Gone are the days of painstakingly rolling each cake pop by hand, hoping for a uniform shape. Cake pop molds have revolutionized the process, offering unparalleled consistency and efficiency. They are designed to create perfectly round or uniquely shaped cake balls with minimal effort. This consistency is crucial, not just for aesthetics but also for even coating and drying during the decorating phase. When you use quality cake pop molds, you ensure that each pop is the same size, leading to a more professional and appealing presentation. Beyond uniformity, these molds significantly reduce prep time and mess. Instead of sticky hands and crumbly countertops from manual shaping, you simply press your cake mixture into the mold cavities. The result is a smooth, dense cake ball ready for its stick and coating. For anyone aiming to produce large batches for events or sales, the efficiency provided by cake pop molds is indispensable. They take the guesswork out of sizing and shaping, allowing you to focus on the fun part: decorating!Types of Cake Pop Molds: Finding Your Perfect Match
The market offers a diverse range of cake pop molds, each with its own advantages. Understanding these differences will help you choose the best tools for your baking style and desired outcomes.Silicone Cake Pop Molds
Silicone molds are perhaps the most popular type of cake pop molds due to their flexibility, durability, and ease of use. They typically come in sheets with multiple cavities, often 20 or more, allowing you to make many pops at once. Their non-stick properties make it incredibly easy to remove the finished cake balls without damage. Many "super value complete kits" mentioned in our data, such as those including "2pcs 20 cavity silicone cake pop molds," are built around this versatile material. Silicone is also oven-safe, freezer-safe, and dishwasher-safe, making cleanup a breeze. The flexibility of silicone also lends itself well to creating "unique 3D shapes with our injection mold cake pop molds," allowing for more intricate designs than traditional round molds.Metal Cake Pop Makers
While less common for the cake ball shaping itself, some kits might include metal components for baking the cake directly into a spherical shape, similar to a mini cupcake maker. These often produce a slightly different texture, more akin to a baked donut hole. However, for traditional cake pops (which are typically made from baked cake crumbs mixed with frosting), silicone or cutter molds are generally preferred for shaping the mixture.Cutter/Popper Cake Pop Molds
These innovative tools, often referred to as "cutter/popper cake pop mold with cutter handles," are designed for speed and efficiency. Instead of baking in the mold, you use them to cut and shape pre-baked cake. They work by pressing down onto a sheet of cake, cutting out the perfect sphere, and often have a plunger tool that "cuts 6 cake pops at a time with plunger tool." This method is incredibly fast and easy, making it ideal for high-volume production. The consistency achieved is excellent, and it bypasses the need to bake directly in the mold, which some bakers prefer.3D and Novelty Cake Pop Molds
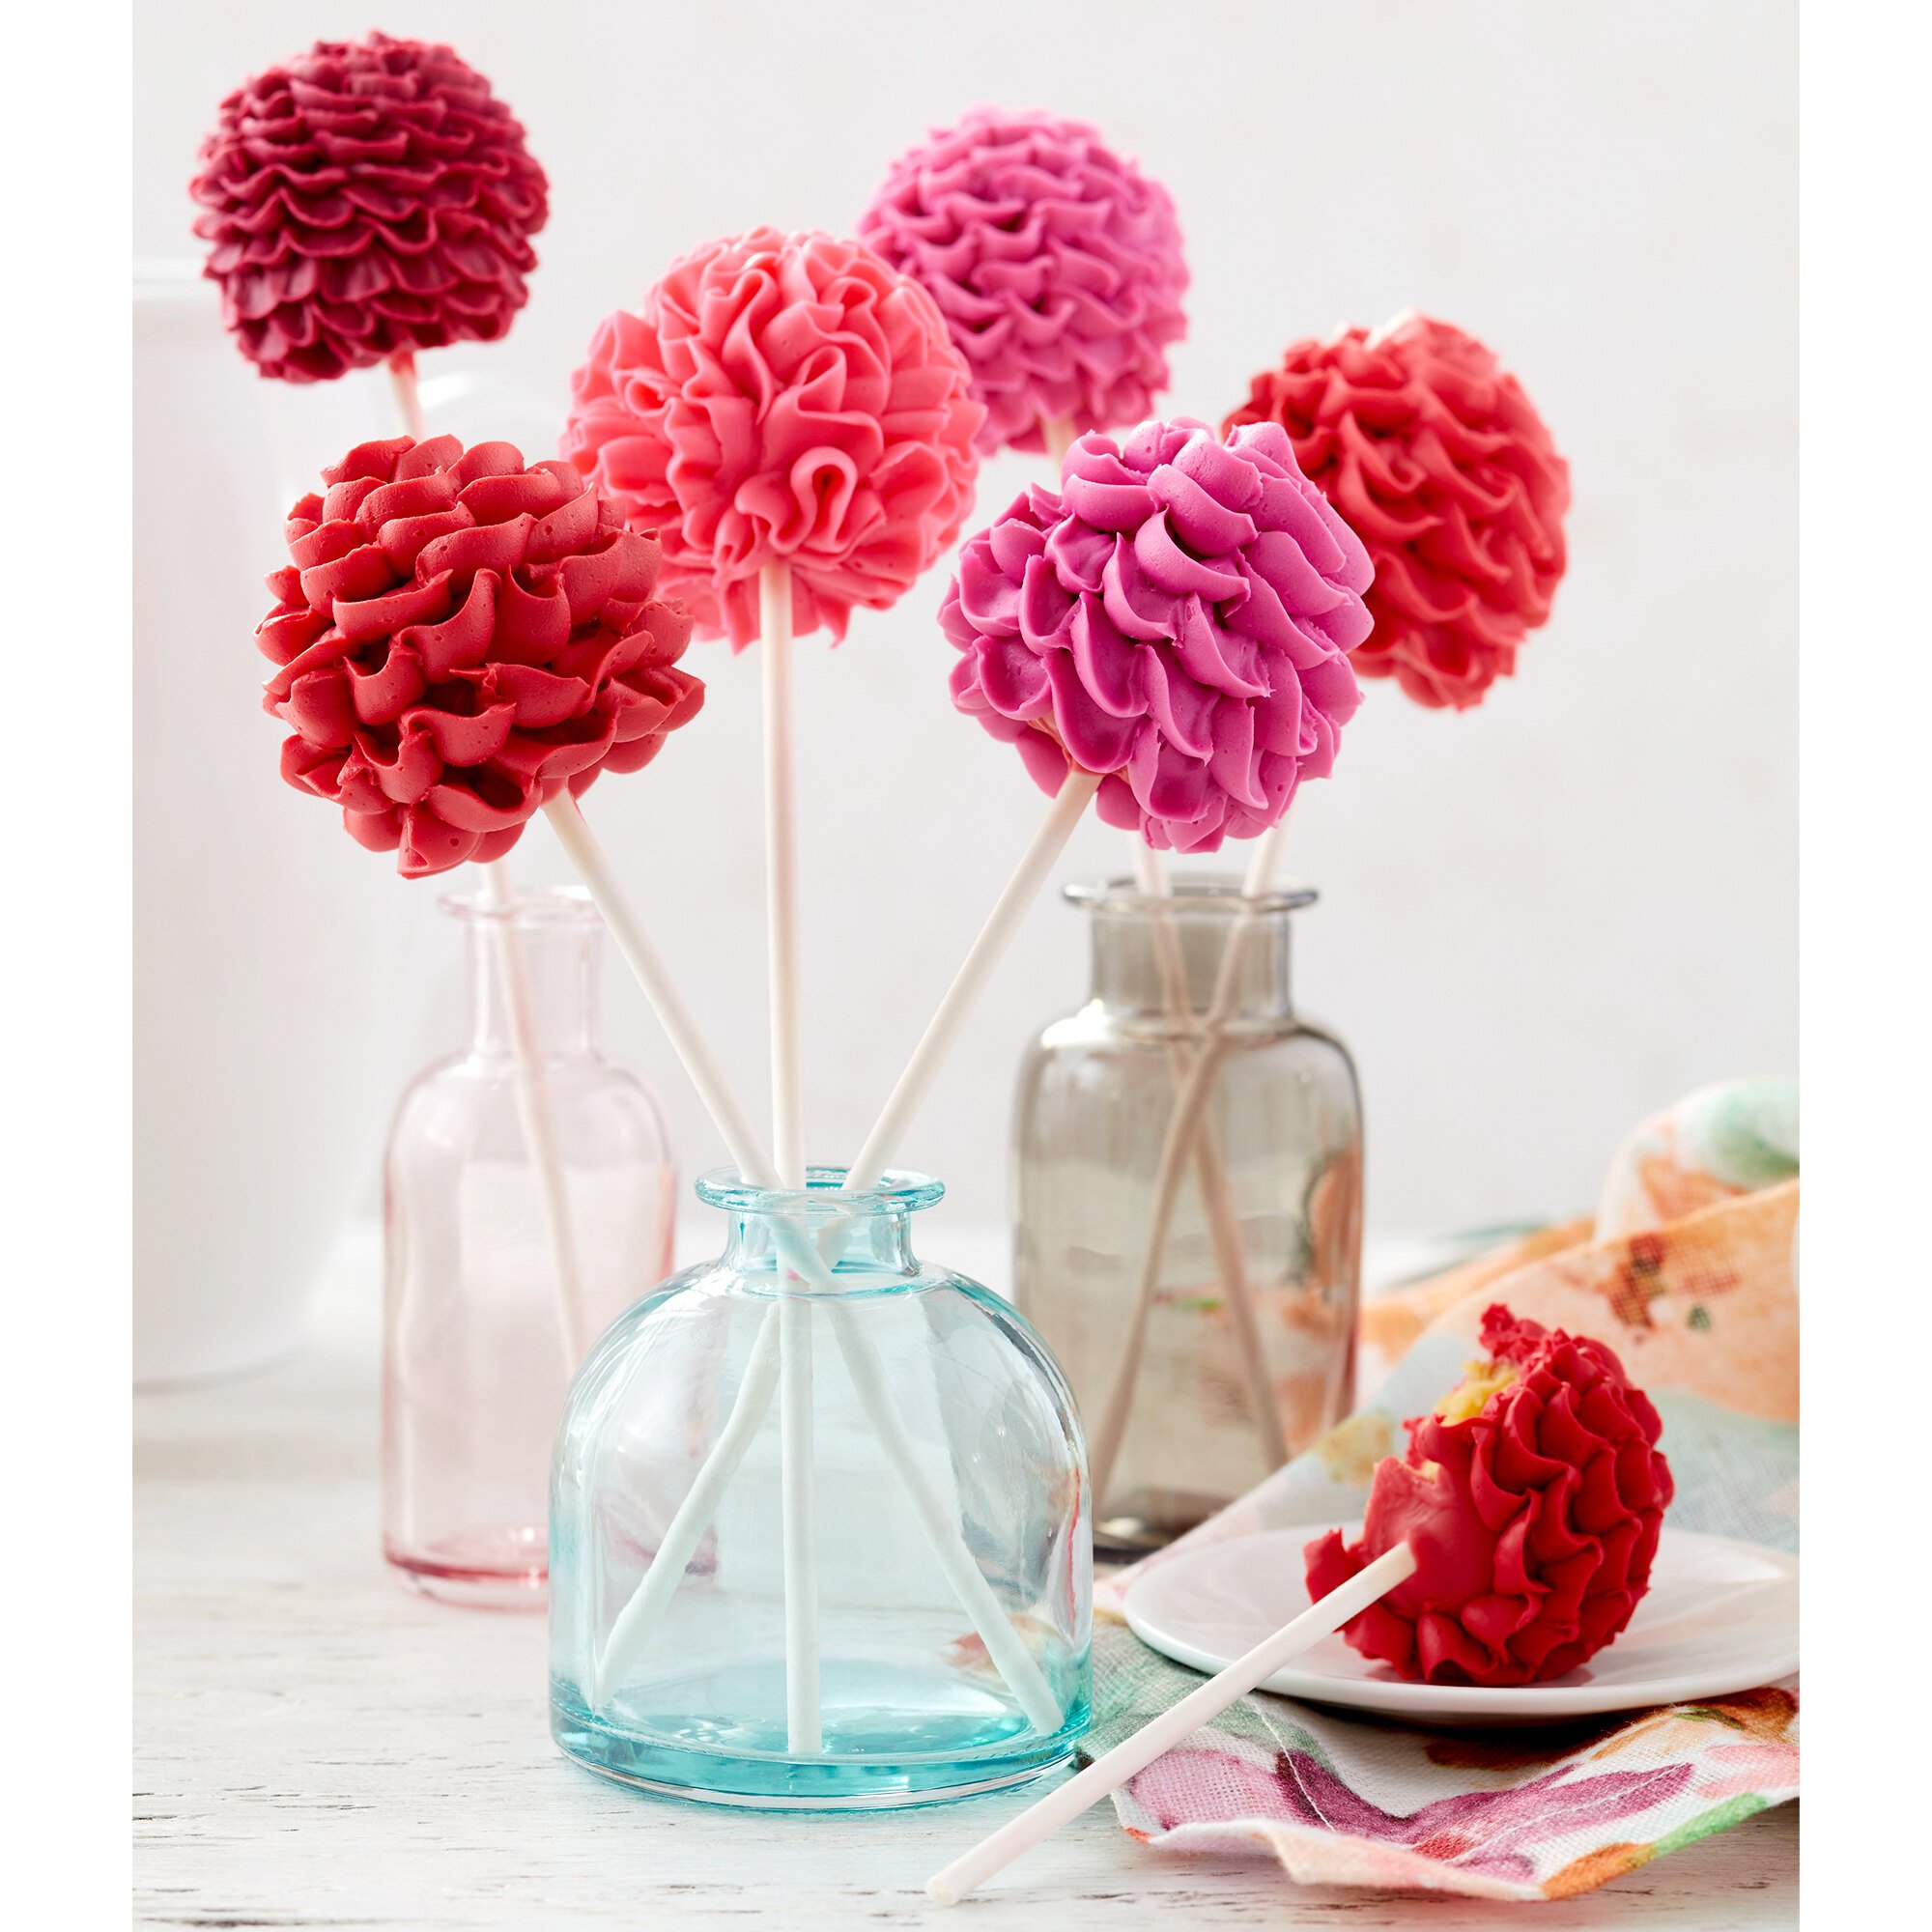
For those looking to add an extra layer of creativity, "make cake pops in unique 3D shapes with our injection mold cake pop molds" are a fantastic option. These molds allow you to create pops in various fun forms, such as cute bunnies, hearts, or even intricate character designs. Our data mentions "cute bunny cake pop mold 4 cavities ice pop cakesicle molds silicone ice cream mold, easter silicone popsicle molds, ice pop mold, cute bunny ice pop molds," highlighting the versatility of these molds for seasonal or themed treats. They often come in two halves that snap together, forming a fully enclosed shape. This type of mold truly allows for "everything you need to make the perfect cake pop.💕 3d cake pop molds, cake boards, resting tray, luster dusts, edible paint, fondant molds, supplies" to come to life, as the unique shapes inspire more elaborate decoration.Flat Cake Puck Molds
A newer variation, the "cake puck mold set, chocolate covered flat cake pop mold," offers a different take on the cake pop. These molds create a flatter, disc-shaped cake pop, which is often fully encased in chocolate. The "2 pack cake puck mold with 1 tray, 1 scraper, silicone desserts molds for candy mini cakes jelly baking 3.9" mentioned in the data suggests these are designed for ease of coating and presentation, offering a modern, minimalist aesthetic. They are particularly good for creating a smooth, even surface for intricate chocolate designs or edible images.Preparing Your Cake: The Foundation for Perfect Pops
Before you even think about cake pop molds, you need the perfect cake. While you can use any cake recipe, the key is to have a cake that's moist but not too crumbly. "Sheet cakes are the way to go" for cake pops, as they provide a large, even surface for crumbling. "Single layer cakes topped with fluffy frostings are easy to both prepare and serve" and are also excellent candidates for transforming into cake pops. To start, "preheat the oven to 350 degrees F." For the cake itself, you might "whisk together the flour, baking powder and..." other dry ingredients, or "sift the flour, sugar, cocoa, baking soda, baking powder, and salt" for a truly fine, consistent texture. Some recipes call for specific wet ingredients: "In a blender, combine the eggs, milk, almond extract, flour, granulated sugar, and salt and blend until just combined." You might then "drizzle in the butter and blend until just combined." For a banana cake base, "for the cake, mash the bananas in a large bowl with a fork or potato masher until very smooth," then "whisk in the dark brown sugar, melted butter, sour cream, eggs and vanilla until smooth and..." all before baking. Once baked, let the cake cool completely. This is crucial. A warm cake will be too soft and sticky to crumble properly. Once cooled, crumble the cake into fine crumbs. You can do this by hand or in a food processor. The goal is to have a consistent texture, free of large chunks. Next, it's time to add the binder – typically frosting. Start by adding a small amount of frosting to your cake crumbs. Mix thoroughly until the mixture comes together and can be easily rolled into a ball without crumbling. The consistency should be similar to play-dough. Avoid adding too much frosting, as this will make your cake pops too soft and difficult to work with. Remember, the goal is a cohesive, moldable dough.Mastering the Mold: Step-by-Step Guide to Using Cake Pop Molds
Using cake pop molds effectively ensures perfectly shaped treats every time. Here’s a detailed guide: 1. **Prepare Your Molds:** Even with non-stick silicone, a little prep can go a long way, especially for intricate 3D designs. For metal pans, you'd typically "coat the sides, bottom and corners of the pan, then remove excess." For silicone molds, a light spray of non-stick cooking oil can be beneficial, particularly if your cake mixture is on the stickier side. For traditional cake pans that might hold cake cubes before molding, a "baking tray with a spritz of oil to keep the cake cubes from sticking" is a good idea. For a full cake base, you might "line with parchment paper, then butter and flour the pans," or "butter the parchment and dust the pans with flour, tapping out the excess." The principle is that "the butter and flour combination will help the cake come out of the pan easily once baked." 2. **Fill the Molds:** Take your prepared cake pop mixture and press it firmly into each cavity of the mold. Ensure the mixture is packed tightly to eliminate air pockets, which can lead to cracks or uneven shapes. For two-part molds (like many 3D designs), fill one half, then gently press the other half on top, allowing the excess to squeeze out. 3. **Chill Time:** Once filled, place the molds in the refrigerator or freezer for at least 15-30 minutes. This chilling period is vital. It firms up the cake balls, making them much easier to remove from the mold without losing their shape and ensuring they stay securely on the stick. 4. **Remove from Molds:** For silicone cake pop molds, gently push from the bottom of each cavity to release the cake ball. Their flexibility makes this process incredibly easy. For two-part molds, carefully separate the halves. You'll be amazed at how "no fuss, no mess, same great shape every time" is achieved. 5. **Insert Sticks:** Dip the tip of each cake pop stick into melted candy melts (we'll get to this in the next section) or melted chocolate, then immediately insert it about halfway into the chilled cake ball. The melted coating acts as a "glue" to secure the stick. Return the pops to the refrigerator or a "resting tray" to set the stick firmly, usually for another 10-15 minutes. This step is critical to prevent your pops from falling off their sticks during dipping.Decorating Your Masterpieces: Beyond the Mold
Once your cake pops are perfectly shaped and chilled, the real fun begins: decorating! This is where you can unleash your creativity. The most common coating is candy melts. "I’ll be melting candy with white and chocolate candy melts" for a classic look. You can also use tempered chocolate for a richer flavor. Ensure your melted coating is smooth and fluid. If it's too thick, add a small amount of shortening or a specialized candy melt thinning agent. Dip each cake pop into the melted coating, ensuring it's fully submerged. Gently tap off any excess coating. Work quickly, as the cold cake pop will cause the coating to set rapidly. For drying, "polystyrene will be used to insert the" sticks, allowing the pops to dry upright without touching anything. You can also use a dedicated "cake pop maker kit with molds and stand" or a simple block of styrofoam. Beyond basic dipping, the decorating possibilities are endless. You can add sprinkles, edible glitter ("luster dusts"), edible paint, or use "fondant molds" to create intricate designs. "2 cups powdered sugar, sifted" can be used for glazes, and "1 heaping tablespoon raspberry jam" can be incorporated into glazes or fillings for a burst of flavor. Many comprehensive kits, like the one that "included cupcake molds, lollipop sticks, bags, ties, a decorating pen, and a chocolate" dispenser, provide "everything you need to make the perfect cake pop."Choosing the Best Cake Pop Molds for Your Needs
When selecting cake pop molds, consider these factors: * **Material:** Silicone offers flexibility and easy release. Metal (for baked pops) provides durability. * **Capacity:** How many pops do you want to make at once? Molds come in various cavity counts, from 4-cavity "cute bunny cake pop mold" sets to "2pcs 20 cavity silicone cake pop molds." * **Shape:** Do you want classic round pops, "unique 3D shapes," or "chocolate covered flat cake pop mold" pucks? * **Included Accessories:** Many molds come as part of a "super value complete kit." A kit might include "100 cake pop sticks, 100 parcel bags, 800 metallic twist ties, 1 piece 250 ml silicone measuring cup and." Another "cake pop molds kit 606pcs lollipop cake pop set" might boast "1 cake pop scooper and decorating pen, 200 cake pop sticks and 200 wrappers, 200 twist ties for lollipop, candies, chocolates." Consider what "this was a really nice, comprehensive kit with everything you would need to make cake pops.it included two sets of 20 round molds, cake pop sticks," and if that aligns with your needs. * **Ease of Cleaning:** Dishwasher-safe molds are a huge plus. For beginners, a basic silicone mold kit with sticks and bags is a great starting point. As you gain confidence, you can explore more specialized "3D cake pop molds" or "cutter/popper cake pop mold with cutter handles" for faster production.Troubleshooting Common Cake Pop Mold Challenges
Even with the best cake pop molds, you might encounter a few hiccups. Here's how to address them: * **Pops Sticking to the Mold:** * **Solution:** Ensure your cake mixture isn't too wet. Over-mixing can also make it stickier. If using silicone, a very light spray of cooking oil can help, especially for first-time use or very intricate molds. Ensure the cake balls are properly chilled before attempting to remove them. * **Pops Cracking After Molding:** * **Solution:** This often happens if the cake mixture is too dry or if it's not packed firmly enough into the mold, leaving air pockets. Add a tiny bit more frosting to your mixture to increase moisture and ensure you press it down well. * **Pops Falling Off Sticks:** * **Solution:** The stick wasn't properly secured. Always dip the stick into melted candy melts or chocolate before inserting it into the chilled cake ball. Let this "glue" set completely in the fridge before dipping the entire pop. Ensure the cake ball is firm and cold. * **Coating Too Thick/Thin:** * **Solution:** For thick coating, add a little shortening or a specialized thinning agent to your candy melts. For thin coating, your melts might be too hot or you might need to add more candy melts to the bowl to ensure a deep enough dip. * **Uneven Shapes from Cutter/Popper Molds:** * **Solution:** Ensure your baked cake layer is of even thickness. Press down firmly and consistently when using the cutter.The Ultimate Cake Pop Experience: Kits and Accessories
To truly elevate your cake pop game, consider investing in a comprehensive kit. As our data suggests, "this was a really nice, comprehensive kit with everything you would need to make cake pops.it included two sets of 20 round molds, cake pop sticks,." These kits are designed to provide a seamless experience from start to finish. A "super value complete kit" might include: * **Cake Pop Molds:** Often multiple silicone molds with many cavities. * **Cake Pop Sticks:** Essential for holding your creations. * **Parcel Bags & Twist Ties:** For individual packaging, perfect for gifts or selling. "100 parcel bags, 800 metallic twist ties" are common inclusions. * **Measuring Cups:** A "1 piece 250 ml silicone measuring cup" can be handy for precise liquid additions. * **Decorating Tools:** Some kits, like the "cake pop molds kit 606pcs lollipop cake pop set," come with a "1 cake pop scooper and decorating pen" for precise filling and intricate designs. "Chocolate" melting pots or pens are also often included. * **Stands/Drying Racks:** A "cake pop maker kit with molds and stand" is invaluable for drying and displaying your finished pops. "Polystyrene will be used to insert the" sticks for drying. "Now, this is the king of cake pop sets," the data proclaims, highlighting kits that go above and beyond, potentially including "cupcake molds, lollipop sticks, bags, ties, a decorating pen, and a chocolate" melter, truly offering "everything you need to make the perfect cake pop." These comprehensive sets not only save you time and money but also ensure you have all the necessary tools to create professional-looking cake pops right from the start. In conclusion, cake pop molds are an indispensable tool for anyone looking to master the art of cake pop creation. They provide the foundation for consistent, beautiful results, allowing you to focus on the creative joy of decorating. By understanding the different types of molds, preparing your cake properly, and mastering the molding and decorating techniques, you'll be well on your way to crafting delightful treats that are sure to impress. Have you tried making cake pops with molds before? What are your favorite tips or challenges? Share your experiences in the comments below! And if you found this guide helpful, don't forget to share it with your fellow baking enthusiasts!